From Frustration to Firewall: My Journey Securing My Personal Cloud


MD ZIAUR RAHMAN
Freelance Linux System Administrator | Open-Source Infrastructure & Automation | Docker • Kubernetes • PostgreSQL • n8n
A few weeks ago, I sat down at my desk, pulled up my server logs, and let out a sigh. There they were again: a long, relentless stream of “Login failed” entries.
Like many of you, I moved to self-hosting my own Nextcloud instance because I wanted to take back control of my data. But I quickly learned that with total control comes total responsibility. When you step away from the big cloud providers, you become your own IT department, your own security guard, and—when things go wrong—your own tech support. Many cloud computing examples show exactly this shift from managed services to self-managed infrastructure.
Seeing those failed login attempts from random IP addresses was a wake-up call. It was a clear sign that I wasn’t just hosting a server; I was participating in the “wild west” of the public internet.
Advertisement
The Problem: When Your Data Gets Attention
If you’ve ever looked at your server logs, you’ve likely seen them: automated bots and scripts constantly probing for weak spots. They don’t care who you are; they look for an unlocked door.
For a while, I thought I was fine. But watching that list of failed attempts grow made it clear that manual monitoring wasn’t a real strategy. I needed a system that worked while I was sleeping, at work, or grabbing a coffee. I needed Fail2ban.
The “Aha!” Moment: Why Containerization Changes Everything
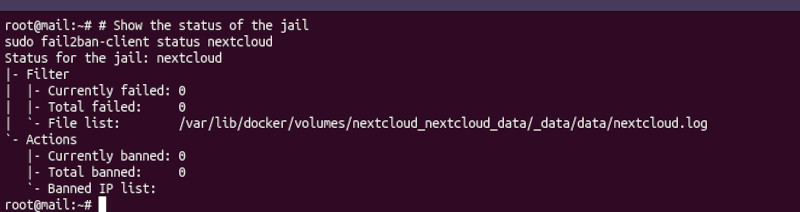
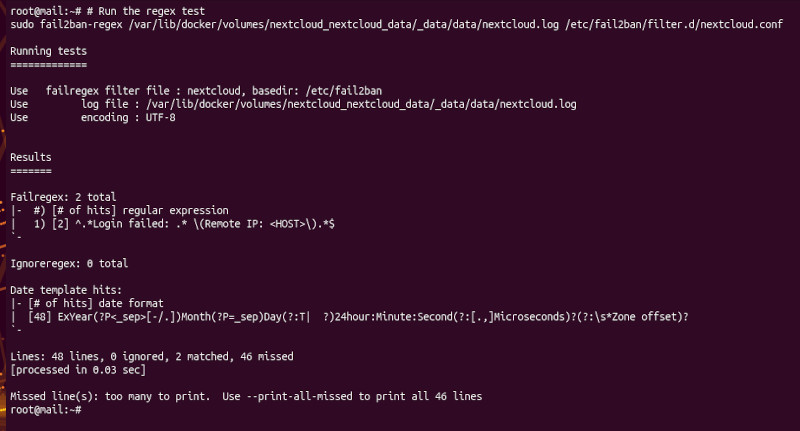
I run my Nextcloud instance in a Docker container—it’s clean, portable, and keeps my system organized. Many cloud computing engineering professionals face the same challenge when running Docker Home Assistant alongside other containerized services. But it also made this security upgrade harder. Fail2ban is designed to look at local files, and my logs were tucked away inside a Docker volume.
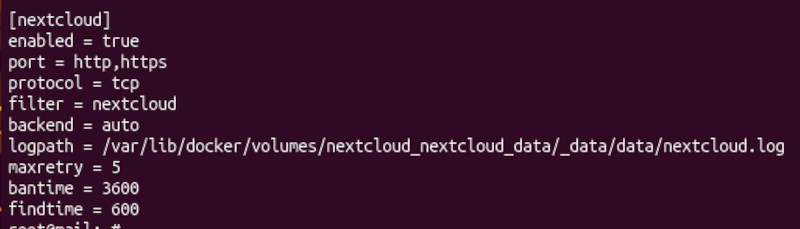
I spent an afternoon hitting “Permission denied” errors and struggling to point my security tools at the right path. It wasn’t the glamorous side of tech; it was just me, a cold cup of coffee, and a lot of trial and error in the terminal. But there is something incredibly satisfying about finally seeing that “File list” populate correctly in the status report. It felt like I’d finally built a real, working moat around my digital castle.
Lessons Learned (The Hard Way)
This wasn’t just about installing a plugin. It was a crash course in:
- The Reality of Security: It’s not a one-time setup; it’s an ongoing conversation between your server and the world.
- Proactive vs. Reactive: I moved from watching attacks unfold to letting my server handle them automatically.
- The Value of Community: It took a bit of digging to bridge the gap between my Docker setup and the host-level security tools, but it proved that even the toughest technical roadblocks can be cleared with a bit of patience and documentation.
Why Self-Hosting is Worth It
People often ask me why I put myself through the stress of troubleshooting logs and configuring firewalls instead of just paying for a managed service. My answer is simple: I’ve learned more about networking, security, and Linux administration in the last few months than I did in years of just “using” cloud services.
By securing my own instance, I’m not just protecting files; I’m building a skill set that makes me a better, more capable engineer.
Are you self-hosting your own cloud? Have you faced similar battles with your logs? Let’s talk about it in the comments.
[Disclosure: This post contains a referral link for NSAVE (A secure cross-border financial platform for freelancers and remote workers to hold USD, GBP, and EUR safely offshore). If you sign up using the link below, I may receive a benefit, and you will receive a free month of the Pro subscription.]